TR 405-95 – Medical Department Individual Equipment
| TR 405-95 | ||||||||
| 1 | ||||||||
|
||||||||
| Paragraph | ||||||||
| Description of Equipment | 1 | |||||||
| To put on full Field Equipment | 2 | |||||||
| Adjustment of Equipment | 3 | |||||||
| To remove Equipment | 4 | |||||||
| Care of Equipment | 5 | |||||||
| Mounted Equipment | 6 | |||||||
| Display of Equipment | 7 | |||||||
| Officers’ Equipment | 8 | |||||||
1. Description of Equipment
a. General. – In addition to the equipment common to every soldier and carried on his person, the Medical Department soldier carries the Individual Equipment peculiar to his own service (i.e. the Medical Department). The new Medical Department Individual Equipment (termed Kit, Medical Private; Kit, Veterinary, N.C.O.; etc.) consists of the following major items (fig. 1):
- One Suspender.
- Two Cantle Ring Straps, one for each Pouch.
- Two Litter-Carrying Straps.
- Two Canvas Pouches.
- One Insert. (for Medical and Dental Private; for Medical Officer and Medical Noncommissioned Officer; for Dental Officer)
NOTE – For detailed list of contents of Pouches, see Medical Department Supply Catalogue
b. Detailed. – The Suspender. – The Suspender (1) is designed to carry the Pouches which are attached to the Suspender by snaps, front and rear. The Suspender also acts as a yoke, distributing equally the weight of the loaded Litter, when the Litter-Carrying Straps are used.
(2) Cantle Ring Straps. – (a) The Cantle Ring Straps (2) have adjustable loops. Snaps are attached to each end. The Cantle Ring Straps are used in three ways:
1. To adjust the spacing of the Pouches at the rear when the Pouches are attached to
the Suspender.
2. To act as a hand-carrying strap for the Pouch when it is not used in connection with the
Suspender.
3. To secure the Pouch to the Cantle Ring of the standard Saddle when in use by Mounted
Troops.
(b) When dismounted, but one Cantle Ring Strap is used, the extra strap being carried on the back of the right-hand Pouch.
(3) Litter-Carrying Straps. – The Litter-Carrying Straps (3) have an adjustable loop. Snaps are attached to each end. These Straps are used as follows:
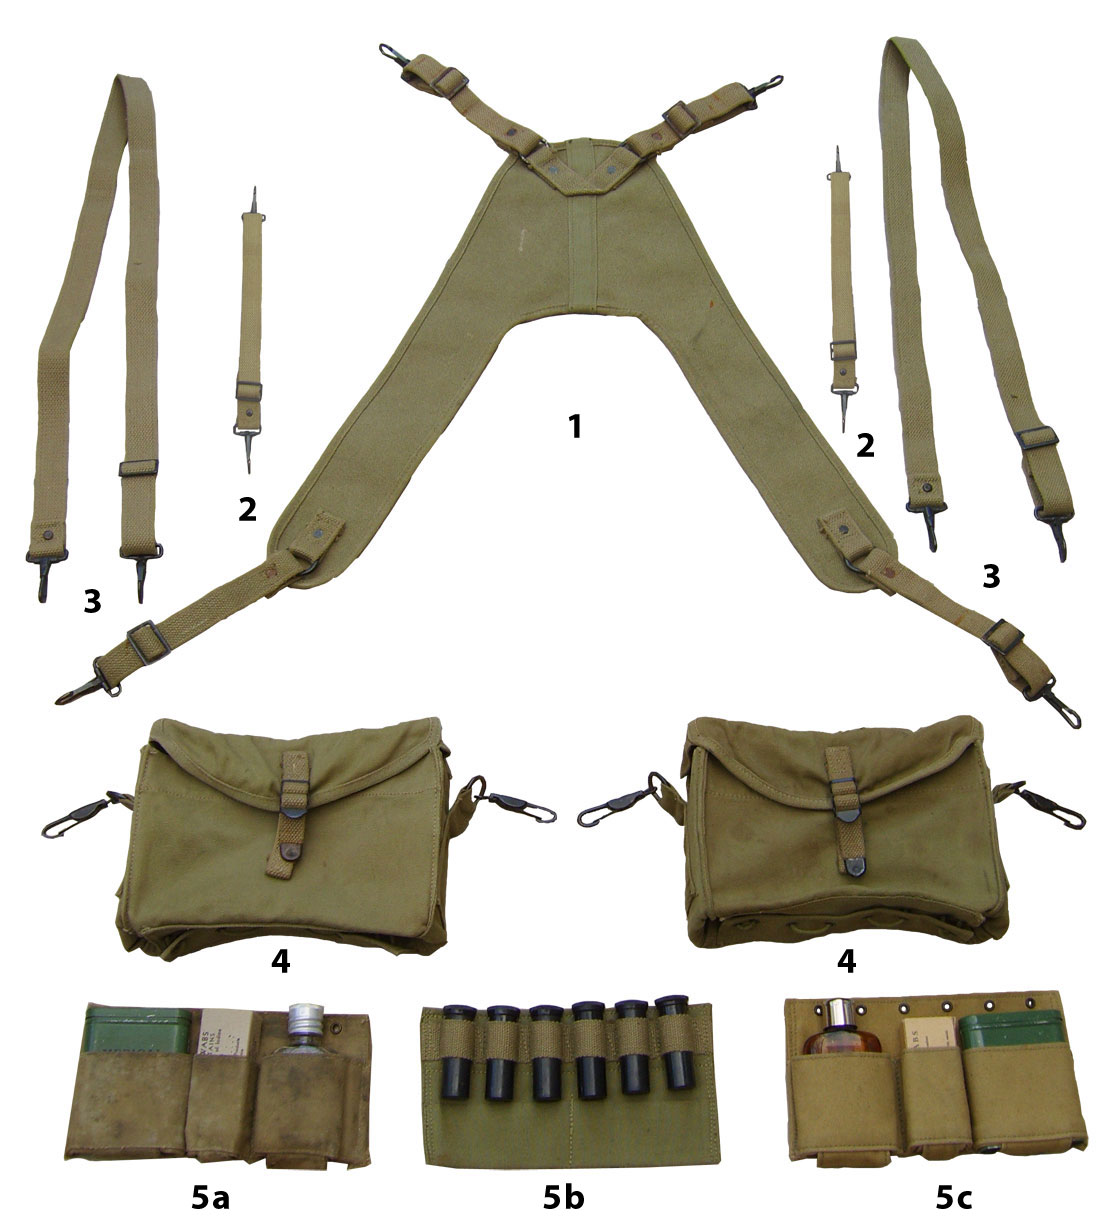
Figure 1. – Items of individual equipment, Medical Department
- Suspender.
- Cantle ring strap.
- Litter-carrying strap.
- Canvas pouch.
- Insert.
- For medical and dental private.
- For medical officer and medical noncommissioned officer
- For dental officer.
-
Click to Enlarge
- To replace the slings used on the standard Litter by attaching them to the forward and rear Rings on the Suspender, adjusting the length by means of the
sliding loop and inserting the handles of the standard Litter through the sling thus formed. - As a Shoulder-Carrying Strap when only one Pouch is used. This is mainly for the convenience of Officers. When not in use, the Straps are carried in one of the
Pouches.

Photograph comparing the various models of Medical Pouch issued during WW2. The earliest example is shown at the top left, and is closed by means of a leather strap and buckle assembly.
(4) The Pouch (fig. 2). – The Pouch has a false bottom that is normally kept folded inside, but which can be extended, thereby doubling the capacity. Rings on the ends of the Pouch are used for attachment to the Suspender. The series of loops sewed on the back of each Pouch are intended to hold it securely to the Saddle bag by Mounted troops. The Insert is for convenience in packing articles of equipment. The Insert is attached inside the Pouch by means of the tipped String passed through eyelets that register on Insert and Flap sewed to the Pouch.

Figure 2. – The pouch
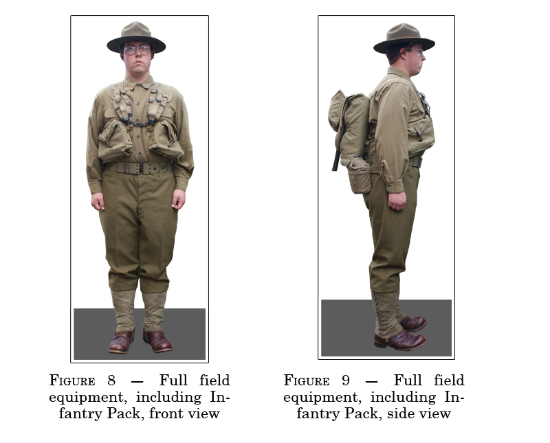
2. To Put On Full Field Equipment (pars. 1b, 2c, and 3c, TR 50-80).
The web Pistol Belt with Canteen and First Aid Packet attached is put on first, followed by the Medical Kit. Then the Infantry Pack (i.e. Haversack) (TR 50-80) is put on. In assembling the Infantry Pack, the Hand Ax is attached to the Haversack in lieu of the Infantry Intrenching Tool.
3. Adjustment Of Equipment.
a. The adjustment of the Equipment is best accomplished by one soldier assisting another. The
first adjustment should be supervised by Officers and Noncommissioned Officers.
b. Place the Suspender on the shoulder with the wide sections to the rear. The exact position
should be that affording the greatest comfort. This position will vary with individuals.
c. Suspend the Pouches by snapping the Pouch rings to the front and rear Suspender on each
side. The leather latch strap (later replaced by a web strap) on the Pouch should face to the
front.
d. Hook the snap on front of the Pouch to the ring on the front of the opposite Pouch. When the
conformation of the individual requires it, a wider frontal adjustment of the Pouches may be
obtained by fastening the snaps on each Pouch together.
e. One Cantle Ring Strap is used in the rear adjustment of the Pouches. It is fastened to the rings
at the back of each Pouch. The Equipment is properly adjusted when it affords the maximum
comfort in use.
f. The Suspender straps are then adjusted so that the Pouches will hang horizontally about waist
high and as far as possible to the front.
g. The Infantry Pack (i.e. Haversack) is then put on. The 2 front straps that are used to attach to
the Pistol Belt or Rifle Belt (i.e. Cartridge Belt) are now snapped to the forward rings of the two
Pouches. The middle strap on the under side of the Pack is not used but should be adjusted so
that it will not cause discomfort.
h. When a long Litter carry is anticipated, the Infantry Pack should be removed. The Pouches may
be discarded temporarily and the Litter Straps attached as explained above. The Cantle Ring
Strap used for rear adjustment should then be attached at the front of the Suspender and used
as a breast strap, or the front supporting straps of the Suspender may be attached to the
opposite ends of the Suspender.
4. To Remove Equipment.
To remove the individual Equipment and Pack, unsnap the two straps on the Infantry Pack and remove the Pack. Unsnap the Pouches in front and remove the individual Equipment, then unfasten the web Pistol Belt.
5. Care Of Equipment.
a. The appearance of the Equipment will depend on the manner in which the Pouches are packed
and on the adjustment of the Equipment to the individual. The bottom flaps of the Pouches
should be laced so that eyelets register on each other. (fig. 2) The lacing will then pass up and
down through the eyelets instead of crisscross. The lower half of the Pouch is folded inside and
lies flat on the bottom formed by the laced flaps.
b. The contents of the Pouches must be packed in an orderly manner. Original packing such as the
square paper boxes for adhesive plaster should be eliminated.
c. The leather latch straps on the Pouches should not be buckled so tightly that the front wall of
the Pouch is pulled out of shape.
d. Equipment may be cleaned in the same manner as the other canvas equipment. The shining of
metal parts is not recommended.
6. Mounted Equipment (for Saddle Pack see TR 50-85)
When Mounted, the Suspender is carried in one of the Saddle Bags; the Pouches ride on the Saddle Bags, one on each side. To attach a Pouch to the Saddle, use one Cantle Ring Strap, passing it twice through the Cantle Ring of the Saddle, then snap the free end to the Pouch. To secure a Pouch to the Saddle Bag, unbuckle the latch straps of the Saddle Bag and pass them through the loops on the back of the Pouch, then buckle the latch straps. Adjust the Cantle Ring Strap, making it taut. The Hand Ax (in carrier) is attached to the Pistol Belt and rides over the left hip.
7. Display Of Equipment.
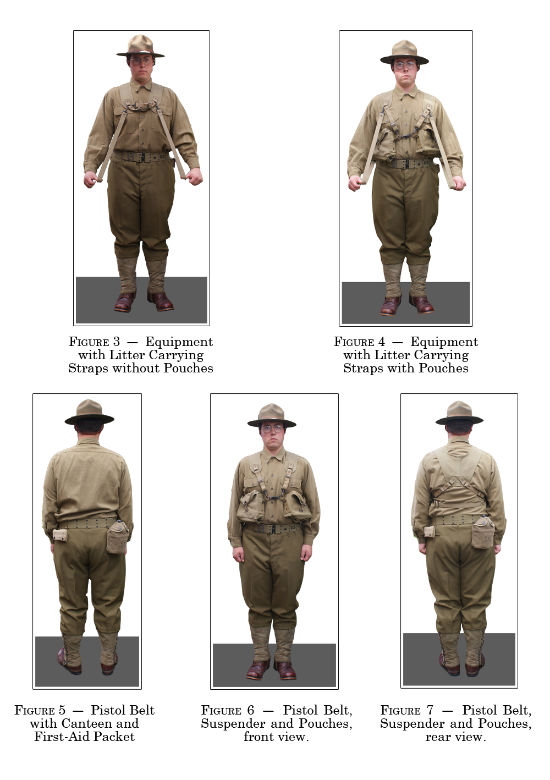
a. Medical. – The individual Equipment of the Medical Private or Private, First Class, is displayed for inspection as shown in Figure 3. In display of the Medical Noncommissioned Officers’ Equipment, the Hypodermic Syringe is opened and displayed inside the right Pouch. The Needle Sterilizer is opened and displayed on the flap of the right Pouch.

Figure 3. – Display of individual equipment, Medical Department (new medical equipment shown.)
b. Veterinary. – The individual Equipment of Veterinary troops is displayed as in the case of other Medical Department troops with the following exceptions:
- Evacuation Tags are displayed in the right Pouch.
- No Equipment is displayed on the flap of the left Pouch.
- For Veterinary Noncommissioned Officers, Safety Pins are displayed on the flap of the left Pouch.
8. Officers’ Equipment.
Kits are provided as articles of Field Equipment for Majors, Captains, and Lieutenants of the Medical, Dental, and Veterinary Corps. A Kit consists of a Pouch with appropriate contents and Inserts, one Cantle Ring Strap (for use Mounted, or as a Hand-Carrying Strap), and one Litter-Carrying Strap (for use Dismounted, if desired). A Dismounted Officer usually carries the Pouch on his left hip suspended by the Litter-Carrying Strap over the right shoulder. A Mounted Officer attaches the Pouch to the Saddle in the same manner as the Enlisted Man.
The present Article was adapted from the original Training Regulations No. 405-95, issued by the War Department on 4 June 1932, describing the new individual equipment to be used by Medical Department personnel. Some minor adaptations have been made since it was impossible for the authors to render all original equipment illustrations and more particularly those related to mounted personnel. We will try and add more photographs later. Thank you for your understanding.